WordPress to Webflow migration is a platform transition that transfers content, structure, and SEO signals from a PHP-based CMS to a visual web design environment without sacrificing organic search rankings.
The decision to switch platforms rarely costs sites their rankings on its own. Execution does. Redirect chains left unmapped, canonical tags misconfigured, and sitemaps never resubmitted are the operational failures that turn a clean platform transition into months of traffic recovery. For content-heavy tech publications, where hundreds of indexed URLs carry accumulated link equity, every step in the migration sequence has a measurable SEO cost if skipped. Starting with a pre-migration SEO audit and ending with a structured platform migration checklist is what separates a smooth cutover from an extended recovery.
Why Tech Publishers Switch From WordPress to Webflow
WordPress to Webflow migration appeals to content teams that have outgrown the gap between design intent and what a PHP-based CMS can deliver without custom development. The visual web design environment Webflow provides collapses that gap: designers control layout at the component level without touching theme PHP files, and hosting, CDN, and SSL are unified under one vendor instead of spread across plugins and separate infrastructure providers. For publishers specifically, three operational drivers dominate the decision.
- Design flexibility without a developer dependency. Webflow's visual canvas lets editorial teams adjust page templates, typography, and component spacing directly. WordPress requires a developer or a page builder plugin for equivalent changes, adding latency to every design iteration.
- Hosting and CDN consolidation. Webflow hosts on a global CDN by default. WordPress sites typically rely on a separate managed host plus an added CDN layer (Cloudflare, Fastly), which introduces more configuration surface and more failure points.
- Reduced plugin surface. A WordPress-based tech publication commonly runs 20-40 active plugins. Each plugin is a maintenance obligation, a compatibility risk, and a potential performance drag. Webflow consolidates SEO settings, form handling, and CMS management into the core product.
- Core Web Vitals ceiling. WordPress installs, particularly those running heavy page builders, often plateau on Largest Contentful Paint and Cumulative Layout Shift scores. Webflow's clean output gives publishers a lower baseline to optimize from.
For a deeper look at how the two platforms compare on SEO architecture before committing to a switch, see WordPress vs Webflow: Which is Better for SEO?
Step 1 - Run a Pre-Migration SEO Audit

A pre-migration SEO audit produces the baseline data that every downstream step depends on. Without it, you have no inventory to map redirects against, no internal link structure to preserve, and no Core Web Vitals snapshot to compare post-launch performance against. Google Search Console verification of your current property should be the first action: it gives you the authoritative index coverage report, including any crawl errors or excluded URLs that need resolution before the migration begins.
Run the audit in this order:
- Export the full URL inventory from Google Search Console. Download the Coverage report filtered to "Valid" URLs. This is your authoritative list of indexed pages. Cross-reference with a Screaming Frog crawl to catch URLs indexed but not linked internally.
- Run an internal link audit with Screaming Frog. Map every internal link by source URL and destination URL. Export the full edge list. This spreadsheet becomes your post-launch validation checklist for verifying that internal links resolve correctly in Webflow.
- Identify orphaned pages during the internal link audit. Pages that receive crawl budget allocation but carry zero internal links are candidates for consolidation or redirection before migration. Flag them in the same spreadsheet.
- Record your crawl request baseline. In Google Search Console, open the Crawl Stats report and note the average daily crawl request volume and the percentage of pages returning 200 status. After migration, a drop in crawl frequency often signals redirect chain problems or blocked resources.
- Capture Core Web Vitals per URL. Use PageSpeed Insights or the Chrome User Experience Report field data export from Google Search Console to record LCP, CLS, and INP scores for your top 20 traffic-driving pages. These numbers are your page speed benchmark for post-launch comparison.
- Document all metadata. Export title tags and meta descriptions from Screaming Frog. You will need these verbatim when rebuilding Webflow CMS collection fields, since Webflow does not import metadata from WordPress XML files.
Output of this step: a confirmed URL inventory, a complete internal link map, a crawl stats snapshot, and a Core Web Vitals baseline per key URL.
Step 2 - Map Your 301 Redirects Before Touching Anything
WordPress to Webflow migration almost always involves a URL structure change, even when teams try to preserve slugs. Category path differences, pagination patterns, and tag archive URLs diverge between the two platforms. The 301 redirect mapping spreadsheet must be complete before any DNS change, any content move, or any Webflow publish event.
URL structure consistency is the primary SEO-preservation mechanism in any platform migration. A 301 redirect signals a permanent move to a new location and passes link equity to the destination URL, as documented in Google Search Central's redirect guidance. Redirect chains above two hops erode that transfer: a request that passes through three redirects before reaching the final URL loses a compounding percentage of equity at each hop, and Googlebot will eventually stop following chains beyond a depth it deems inefficient for crawl budget allocation.
| Old WordPress URL | New Webflow URL | Redirect type | Notes |
|---|---|---|---|
| /category/cloud-services/best-cdn-guide/ | /web-hosting-cloud-services/best-cdn-guide/ | 301 | Category path renamed; slug preserved |
| /tag/webflow/ | /web-hosting-cloud-services/ | 301 | Tag archives have no Webflow equivalent; redirect to sub-pillar |
| /author/amara-okeke/ | /authors/amara-okeke/ | 301 | Author archive path changed |
| /page/2/ (paginated archives) | /web-hosting-cloud-services/ | 301 | Webflow pagination uses different URL pattern; consolidate to hub |
| /feed/ | / | 301 | RSS feed URL changes; update feedburner or subscribers |
Enter every validated redirect pair into Webflow's redirect manager under Project Settings before launch. Webflow applies redirects at the CDN edge, which means they resolve before the request hits the origin server. This is the correct implementation for SEO signal preservation: server-side edge redirects are processed by Googlebot faster and with less latency than application-layer redirects.
After completing the 301 redirect mapping, validate the list in a staging environment before going live. Tools like Redirect Path (browser extension) or the bulk redirect checker in Screaming Frog can simulate redirect chains against your staging domain to catch loops and double-hops before they affect your live index.
Step 3 - Export WordPress Content and Structure
WordPress content export uses the built-in Tools > Export screen, which generates a WXR file (WordPress eXtended RSS), an XML format encoding posts, pages, categories, tags, comments, and basic custom field data. The WordPress.org Tools Export documentation describes the full field set included in a WXR export and the scope limitations that affect complex sites.
For a tech publication migrating to Webflow, the WordPress content export has three important limitations to address before relying on it.
- Custom post types are not exported by default. If your publication uses custom post types for reviews, changelogs, or product listings, the standard WXR export omits them. You need a plugin such as WP All Export to produce a complete custom post type export, or you extract data directly from the database via WP-CLI (
wp post list --post_type=review --format=csv). - Media library files are not included in the WXR. The WordPress XML export contains attachment post records with their original URLs, but it does not bundle the physical files. Media library migration requires either a bulk download via FTP/SFTP from
wp-content/uploads/or a migration plugin that fetches remote media and re-uploads it. Plan for this separately from the WordPress content export step. - Serialized custom fields break on import. Many ACF (Advanced Custom Fields) field values are stored as PHP-serialized strings in the WordPress database. Standard importers cannot parse serialized data into structured fields. Export serialized fields separately using WP-CLI's
wp post meta listcommand and convert them to JSON before mapping to Webflow CMS collection fields.
For publishers that have built their WordPress taxonomy around pillar-spoke architecture, as covered in WordPress vs Drupal for Tech Publishers, the taxonomy mapping step requires particular attention: Webflow CMS collections do not have a native taxonomy system equivalent to WordPress categories and tags, so you will build reference fields and multi-reference fields to replicate hierarchical relationships.
Step 4 - Rebuild Content Architecture in Webflow CMS Collections
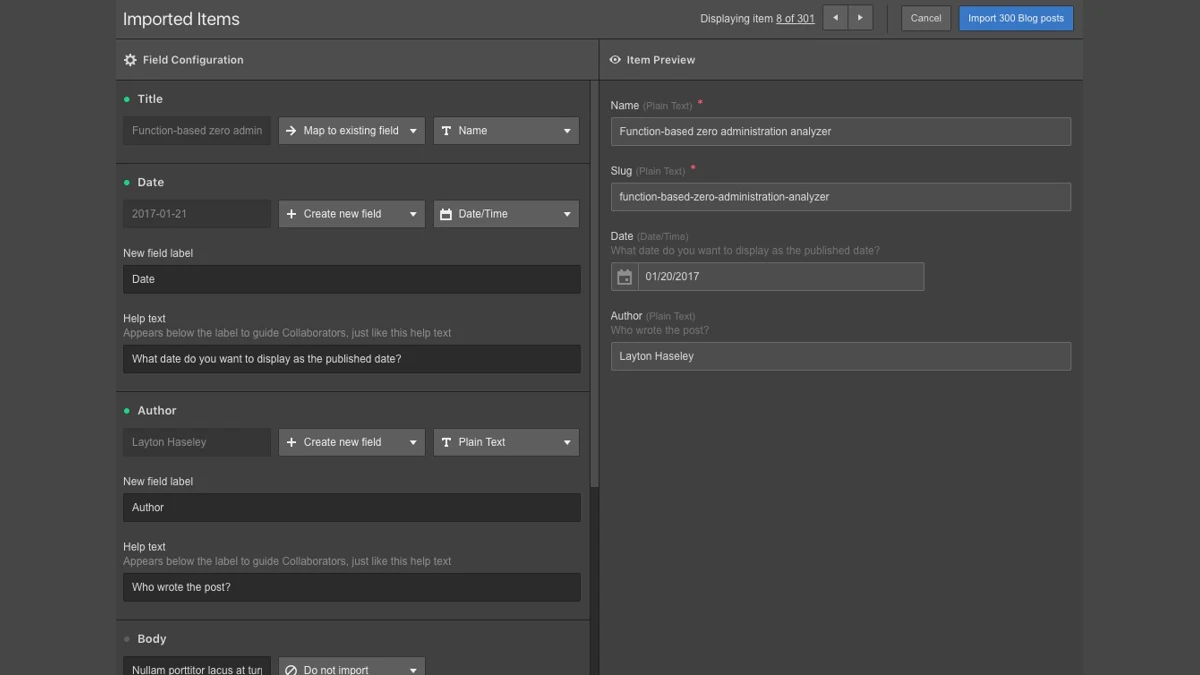
Webflow CMS collections are the structural equivalent of WordPress post types, but the schema must be defined explicitly before any content can be imported. Each collection has a name, a set of typed fields, and optional reference or multi-reference fields connecting it to other collections. The Webflow University CMS introduction details the field types available and the collection configuration interface.
Map your WordPress post types to Webflow CMS collections using the following sequence:
- Define the Articles collection schema. At minimum, create fields for: Title (plain text), Slug (plain text), Body (rich text field), Meta Title (plain text, 60 char limit enforced via validation), Meta Description (plain text, 160 char limit), Author (reference field pointing to an Authors collection), Published Date (date/time), Category (multi-reference to a Categories collection), and Featured Image (image).
- Create supporting collections for Authors and Categories. These reference fields prevent data duplication. Each author entry is a single record; Webflow's reference field links articles to authors without repeating author metadata on every article record.
- Import content via CSV. Webflow accepts CSV imports for CMS collections. Convert your WXR export and custom field exports into a properly formatted CSV with column headers matching your collection field slugs. The rich text field requires HTML input; strip WordPress shortcodes and Gutenberg block JSON before import.
- Run staging environment testing before publishing. Webflow's staging environment (your project's
.webflow.iosubdomain) is available throughout the build phase. - Verify collection templates during staging environment testing. Before pointing your production domain, confirm that reference fields resolve correctly, that rich text field content renders without broken formatting, and that pagination works on archive pages.
- Validate the internal link structure in staging. After content import, run a Screaming Frog crawl against the staging domain. Check for broken internal links caused by URL pattern changes and confirm that the 301 redirect mapping from Step 2 covers every broken destination found.
Since May 2026, Webflow's Premium Site plan, which replaced the CMS and Business plans, includes up to 20,000 CMS items per site, and the old CMS item add-ons have been retired. If your publication exceeds this, split content by type across multiple collections (Articles, News, Reviews) and link them with reference fields rather than building one monolithic collection. For performance, consider pairing your Webflow hosting with a CDN configuration as described in the Cloudflare setup guide.
Step 5 - Configure Canonical Tags and XML Sitemap
Canonical tag configuration in Webflow is automatic for standard collection item URLs: Webflow injects a self-referencing canonical tag matching the published URL of each CMS item. However, automatic canonical generation breaks down in several scenarios that content-heavy publications routinely encounter. Google Search Central's canonical URL consolidation guidance defines the authoritative rules for canonical implementation and the conditions under which canonical signals are ignored.
Address the following canonical scenarios explicitly:
- Override canonicals for paginated URLs. Webflow generates paginated archive URLs (e.g.,
/blog?offset=20). These should not self-canonicalize; they should canonical to the first page of the archive. Set this override in Webflow's Page Settings for the archive template. - Check for duplicate collection item URLs. If you imported content with duplicate slugs (a common artifact of WXR imports where slug uniqueness was not enforced), Webflow will append a number suffix. Audit all collection items for unintended slug changes immediately after import, before the canonical tag configuration is finalized.
- Verify URL structure consistency for query-string URLs. Webflow's filter and sort parameters append query strings to collection list URLs. Confirm that these parameterized URLs either return a canonical pointing to the base URL or are excluded from the sitemap. Maintaining URL structure consistency across canonical declarations and sitemap entries prevents duplicate content signals.
- Generate and submit the XML sitemap. Webflow auto-generates a sitemap at
/sitemap.xmlonce the site is published to a custom domain. After launch, submit via Google Search Console. XML sitemap submission should happen within 24 hours of DNS cutover. Monitor the Coverage report over the following two weeks to confirm that the new URLs are being indexed and that old WordPress URLs are dropping from the index as redirects are processed.
For publications running Cloudflare in front of Webflow, confirm that Cloudflare's Page Rules are not stripping canonical headers or transforming URLs in ways that create mismatches between the canonical tag configuration and the URL Googlebot actually crawls. The CDN selection guide covers the proxy configuration patterns most likely to affect canonical handling.
Step 6 - Validate and Benchmark After Launch
WordPress to Webflow migration is complete at DNS cutover, but SEO signal preservation is only confirmed over the 30 days that follow. Google Search Console verification of the new Webflow property is the first post-launch action. Add the new domain as a property in Search Console using the DNS TXT verification method (Webflow provides the record in Project Settings), then re-verify any existing property that used the WordPress domain variant.
Run this post-launch platform migration checklist for the first 30 days:
- Monitor the Coverage report weekly. Watch for a spike in "Redirect Error" or "Soft 404" classifications in the first week. These indicate redirect mapping gaps. Fix missed redirects in Webflow's redirect manager immediately; do not wait for the next crawl cycle.
- Resubmit the XML sitemap submission. After verifying the new Search Console property, submit the Webflow sitemap. Request indexing for the top 20 traffic URLs individually via the URL Inspection tool to accelerate coverage of high-priority pages.
- Run a page speed benchmark comparison. Pull PageSpeed Insights scores for the same 20 URLs you measured in Step 1. Compare LCP, CLS, and INP against your pre-migration page speed benchmark. Webflow's clean HTML output should show improvement on LCP; if scores have regressed, check for unoptimized media, render-blocking custom code embeds, or misconfigured lazy loading.
- Verify crawl budget allocation has stabilized. After two weeks, return to the Crawl Stats report in Search Console. Average daily crawl requests should be similar to the pre-migration baseline. A sharp drop indicates that Googlebot is encountering redirect chains or server errors that reduce crawl efficiency. A sharp increase can indicate that paginated or parameterized URLs are being discovered unexpectedly.
- Complete Google Search Console verification for all domain variants. Confirm that
wwwand non-wwwvariants both redirect correctly to your canonical domain, and that both variants show consistent coverage data in Search Console. Mismatched domain handling is a common source of post-migration duplicate content signals.
Content-heavy tech publications that publish daily should also monitor organic click data in Search Console for any individual URLs that lose more than 30% of clicks in the first two weeks. A targeted drop on specific pages, rather than a sitewide decline, almost always points to a specific redirect misconfiguration or a canonical tag configuration error on that URL type. Isolate and fix the pattern rather than waiting for aggregate traffic to recover. For ongoing SEO architecture decisions after the migration stabilizes, the WordPress vs Webflow SEO comparison provides the longer-term performance framework.
Further reading
- WordPress vs Webflow: Which is Better for SEO?
- WordPress vs Drupal for Tech Publishers
- Cloudflare Setup Guide
- How to Choose a CDN for WordPress
- Headless E-Commerce Implementation with Next.js and Shopify: A Developer Guide
Standards refs: Google 301 redirects guide; IETF RFC 7231; NIST web archiving.
Standards reference: W3C HTML 5.2.